

This section discusses how to read/write GPIO pin data of the target micro-controller board (connected to the host computer through serial port, WiFi, Ethernet etc.) using a Python script on the host computer. Before starting with the Python script, the target should be programmed with CASP GPIO communication protocol. Refer ‘CASP GPIO Communication’ for details about CASP GPIO protocol and how to program the target board with the ready to use binaries from ‘support/examples/casp_gpio_examples’ directory. Following are some of the note worthy points when using this method
· Extends the capabilities of the host computer. The target board GPIO pins are now virtually part of the host computer.
· The Python script runs on host computer using standard Python libraries. Any 3rd party Python libraries (such as Numpy, Pytorch etc.) can be used.
· Any target micro-controller board supported by CASP can be used.
· Low latency communication between the target board and the host computer.
· Multiple communication interfaces are possible (Serial, Ethernet, WiFi) etc.
· When using WiFi the target board need not be physical connected to the host computer.
Getting Started
Step 1: Ensure CASP Python Libraries are installed as described in this section.
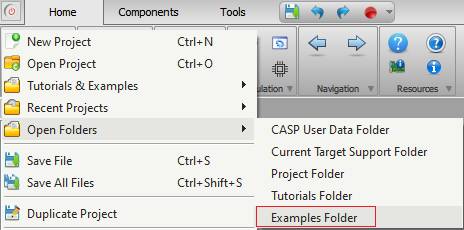
Step 2: CASP provides ready to use binaries (.bin and .hex) for various micro-controller boards that enables CASP GPIO protocol. These binaries are available as part of examples projects from ‘support/examples/casp_gpio_examples’ directory. User can access the ‘examples’ folder by selecting the ‘Examples Folder’ menu item from CASP main menu as shown below.
From the ‘casp_gpio_examples’ directory, use the one that matches your board and directly program the board. Refer this section for further details on how to program the boards with these binaries.
Step 3: Create a new Python script file or open an existing one in any directory of your choice. Add CASP Python Libraries installation path at the top of your Python script file (if required). The details on how to add the path in your script is given here.
Step 4: Import Python GPIO pins definition file corresponding to your selected board from ‘casp_user_data/pycasp/src/casp_gpio_pins’ directory. For example, for Arduino Uno/Nano/Leonardo boards the corresponding file is named as ‘casp_gpio_uno_nano_leonardo_serial_pins.py’. This file consists of GPIO pin definitions to be used in your Python script. Use the following Python code to the import the module into your script
from casp_gpio_pins import casp_gpio_uno_nano_leonardo_serial_pins as pins
Step 5: Import the namespace ‘casp_gpio’ to your Python script with following code
Import casp_gpio
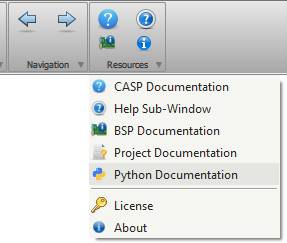
Step6: Use the functions from ‘casp_gpio’ namespace and pin constants from ‘pins’ in your code to communicate with the target. Detailed documentation about these libraries can be accessed by clicking Resources > Python Documentation menu item in CASP main window. Please also go through Python examples provided in each target board folder in ‘casp_gpio_examples’ directory for reference.
Example: Sample code snippet to read ADC value from Arduino Uno and control on-board LED is shown below. As a prerequisite, Arduino Uno board should be programmed with hex file from ‘/CASP/support/examples/casp_gpio_examples/arduino_boards/casp_gpio_uno_nano_leonardo_serial/bin’ directory before trying this example.
